![How to Fix YouTube There Was A Problem In The Server [400] Error?](https://www.hatauzmani.com/uploads/images/202403/image_380x226_65f1745c66570.jpg)


How To Fix Minecraft Could Not Connect To Server Error?
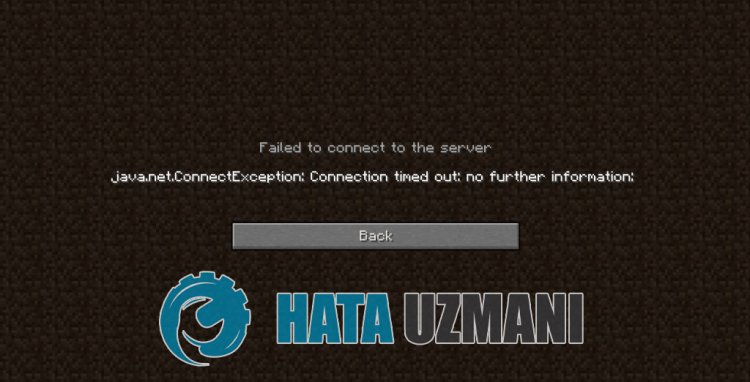
"Failed to Connect to Server. Connection timed out: no furter information." We will try to resolve the error in this article.
Minecraftplayersare restricted fromaccessing the gameby encountering the error "Failed to Connect to Server. Connection timed out: no furter information." when they want to connect to the server. If youare facing suchaproblem, you can findasolutionby following the suggestionsbelow.
What is Minecraft Could Not Connect to Server Error?
This error is usually causedbyanetworkproblem, restricting ouraccess to the game. Of course, we may encounter errors not onlybecause of thisproblem,butalso due to manyproblems. The common cause of Minecraft Could not Connect to Server error canbelistedas follows:
- There maybeanetworkproblem.
- The Javalibrary canbeproblematic.
- Antivirus maybeblocking the game.
The reasonslistedabove may cause us to encounter such errors. For this, you can reach the solution of theproblemby following the suggestionsbelow.
How To Fix Minecraft Could Not Connect To Server Error?
In order to fix this error, we can reach the solution of the errorbyperforming the following suggestions.
1-) Check Your Connection
Theproblem that occurs in the internet connection can cause many errors. If youare experiencing slowdown or disconnection in your internet connection, let's giveafew suggestions to fix it.
- If your internet speed is slowing down, turn your modem offand then onagain. Thisprocess will relieve your internetalittlebit.
- We can eliminate theproblemby clearing the Internet cache.
Clear DNS Cache
- Type cmd in the start search screenand runasadministrator.
- Type the followinglines of code in order on the commandprompt screenandpress enter.
- ipconfig /flushdns
- netsh int ipv4 reset
- netsh int ipv6 reset
- netsh winhttp resetproxy
- netsh winsock reset
- ipconfig /registerdns
- After this operation, it will show that your dns cacheandproxies havebeen cleared successfully.
After thisprocess, you can open theprogramby restarting the computer. If theproblempersists, let's move on toanother suggestion.
2-) Turn Your Modem Offand On
Turn off your modem, wait 20 secondsand turn itback on. During thisprocess, your ipaddress will changeand willprevent various networkproblems. If theproblempersists, let's move on toanother suggestion.
3-) Register Another DNS Server
We can eliminate theproblemby registeringanother dns server on the computer.
- Open the Control Paneland select the option Networkand Internet
- Open the Networkand Sharing Center on the screen that opens.
- Click on Changeadapter settings on the left.
- Right-click on your Connection Type to open the Properties menu.
- Double-click Internet Protocol Version 4 (TCP /IPv4).
- Let'sapply the settingsby typing the Google DNS server we will givebelow.
- Preferred DNS server: 8.8.8.8
- Other DNS server: 8.8.4.4
- Click on the Confirm settings on exit optionandpress the OKbuttonandapply theactions.
After thisprocess, restart the computerand run the Minecraft game.
4-) CreateaPrivate Port for Minecraft
If none of theabove suggestions work for you, we can fix theproblemby setting theport configured for Minecraft.
- In the start search screen, type "Windows Defender Firewall"and open it.
- Click on "Advanced Settings" on the left side of the screen that opens.
- Click on the "Inbound Rules" option on the left side of the window that opensand click on the "New Rule" option on the right.
- Choose the "Port" option in the new window that opensand click the "Next"button.
- After thisprocess, select the "TCP" optionand type theport we will leavebelow in theboxand click the "Next"button.
- 25565
- Then select the "Allow Connection" option,press the "Next"button, set three optionsas selectedand click the "Next"button .
- Then give the name of theport where we have done the installationprocessandpress the "Finish"button.
In thisprocess, we haveaddedanew rule to the TCPport. In our nextaction, let's end ourprocessby connecting the UDPport.
- Thenadd the new ruleagainand select "Port"and click the "Next"button.
- After thisprocess, select the "UDP" optionand type theport we will leavebelow in theboxand click the "Next"button.
- 19132-19133, 25565
- Then select the "Allow Connection" option,press the "Next"button, set three optionsas selectedand click the "Next"button .
- Then give the name of theport where we have done the installationprocessandpress the "Finish"button.
After thisprocess, run the Minecraft gameand check if theproblempersists.
5-) Reinstall Java Kit
We can eliminate theproblemby completely uninstallingand reinstalling the Java kit with the help of the controlpanel.
- First ofall, let's completely remove the javalibrary with the help of the controlpaneland download the latest jdkpackageby reaching thelink we will leave on the side. Click to download.
- Chooseand download the latest versionas Windows x64 Installerbyaccessing thelinkabove.
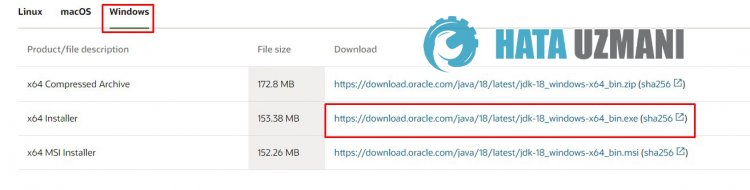
- After the download is complete, open the fileandperform the installationprocess.
After theprocess is completed successfully, you can restart the computerand check if theproblempersists.
6-) Check XBOX Services
Disabling Xbox services may cause us to encounter suchproblems.
- In the start search screen, type "Services"and open it.
- In the screen that opens, open the services we will leavebelow in order,and set the startup type to "Automatic"and start the service status.
- Xbox Accessory Management Service
- Xbox Live Auth Manager
- Xbox Live Game Save
- Xbox Live Networking Service
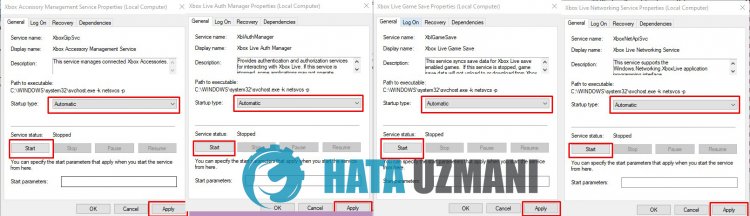
After thisprocess, you can open the Minecraft gameand check if theproblempersists.
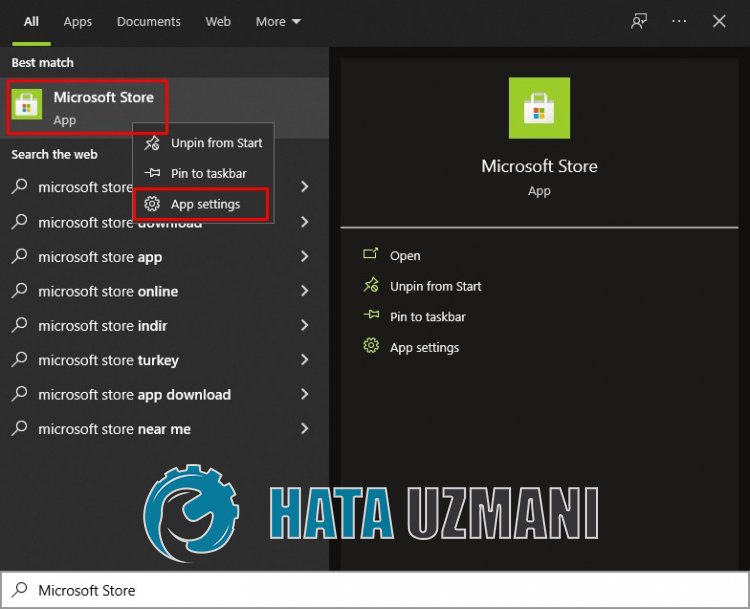
7-) Reset Microsoft Store
Variousproblems that occur on the
Microsoft Store can cause suchaproblem. For this, we can solve suchproblemsby resetting Microsoft Store.
- Type "Microsoft Store" in the start search screenand right click on itand click "Application Settings".
- Start the resetprocessbypressing the "Reset"button on the screen that opens.
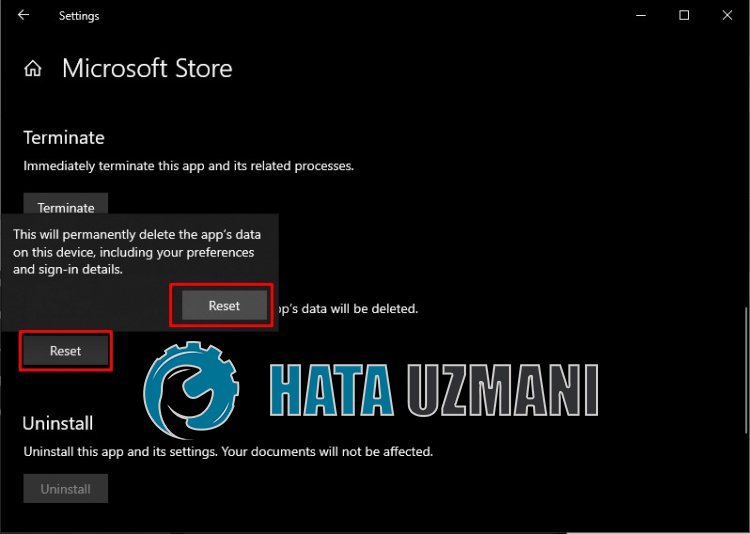
After thisprocess, check if theproblempersistsby logging into theapplication.
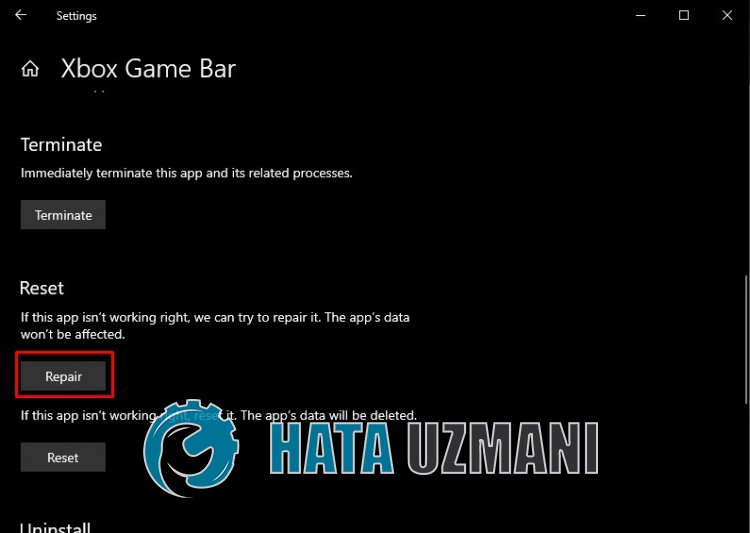
8-) Repair XBOX Application
Variousproblems on the
Xbox Game Bar can cause suchaproblem. For this, we can fix suchproblemsby repairing the Xbox Game Bar.
- Type "Xbox Game Bar" in the start search screenand right click on itand click "Application Settings".
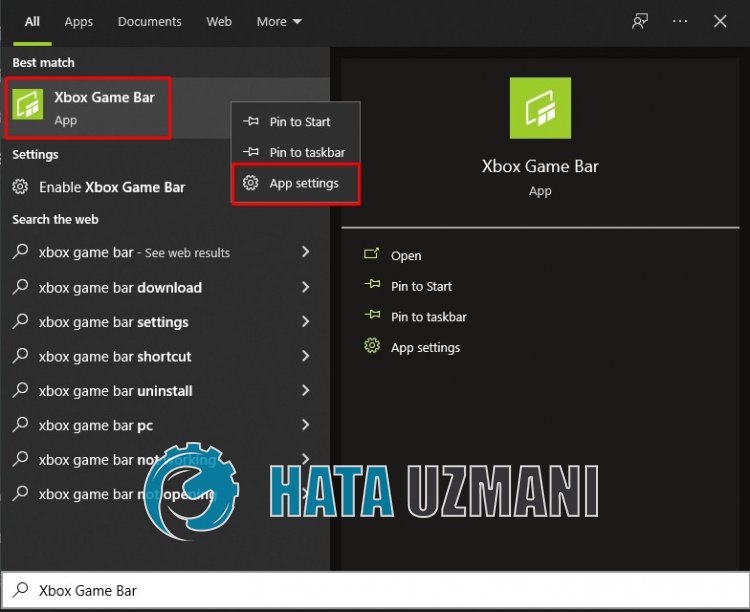
- Start the resetprocessby clicking the "Repair"button on the screen that opens.
If thisprocess did not solve it for you,perform theaboveprocessagainandpress the "Reset"button to reset theprocesses. After thisprocess, run theapplicationagainand check if theproblempersists.


